Manual Partitioning
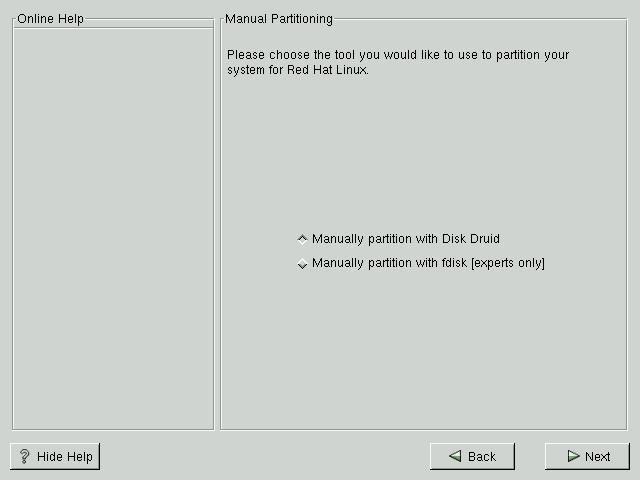
If you chose to perform a custom-class installation, or if you chose to manually partition during a workstation-class or server-class installation, the Manual Partitioning screen is the next screen that you'll see.
When you partition manually, you'll use the partitioning tools provided with Red Hat Linux, but you'll need to make all of the decisions regarding partitioning your system. If you don't feel comfortable partitioning your system, it is recommended that you do not partition manually; instead select Automatic Partitioning by clicking the Back button and choosing to perform a workstation-class or server-class installation.
On this screen, you'll need to choose whether you want to partition with Disk Druid or fdisk. Disk Druid is more user-friendly; fdisk should only be used by experienced users.
General Partitioning Guidelines
You will want to create at least three partitions (or more if you chose to put /usr in a separate partition, etc.).
One of the partitions should be your swap partition. It should be approximately twice the size of the amount of physical RAM present in your machine. The swap partition should be set to the correct partition type (82 for Linux Swap if you're using Disk Druid and 1 if you're using fdisk).
The rest of the partitions compose your Linux filesystem layout. They should be sized appropriately and set to the correct types, depending upon their function.
Partitioning with Disk Druid
If you want to manually partition your system, but you'd prefer to use fdisk to partition, please skip to the section called Partitioning with fdisk.
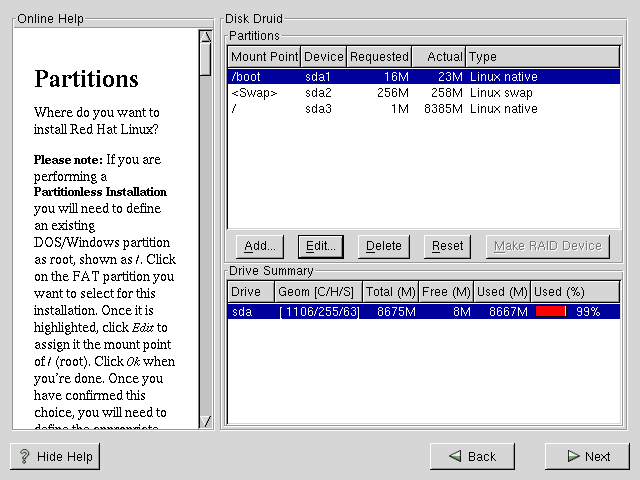
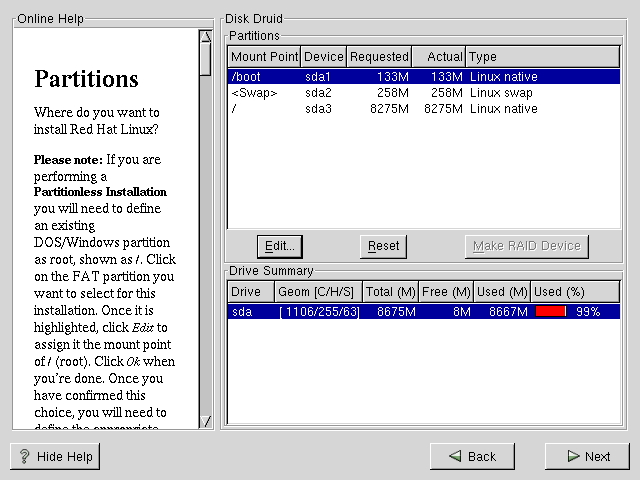
At this point, you'll need to let the installation program know where it should install Red Hat Linux. This is done by defining mount points for one or more disk partitions where Red Hat Linux will be installed. You may also need to create and/or delete partitions at this time (refer to Figure 3-8).
 | Please Note |
|---|---|
If you need to learn the basics about how to partition your system, read the An Introduction to Disk Partitions chapter in Official Red Hat Linux Reference Guide. As a bare minimum, you'll need a boot partition, a swap partition, and at least one Linux partition. |
 | Partitionless Installations are Not Officially Supported |
|---|---|
Partitionless installations on Alpha machines are not officially supported by Red Hat. |
Red Hat Linux 7.0 uses Disk Druid for partitioning. With the exception of certain esoteric situations, Disk Druid can handle the partitioning requirements for a typical Red Hat Linux installation.
SRM has two special partitioning requirements: the use of BSD disk labels and that unallocated space is left at the beginning of the hard drive. Disk Druid is aware of these requirements and will partition your system accordingly — unless your hard drive has a valid MS-DOS partition table. Disk Druid will not convert a hard drive with a valid MS-DOS partition table to use BSD disk labels. To remove the MS-DOS partition table, you'll need to use fdisk to delete all the partitions and write the partition table to the hard drive. After removing the MS-DOS partition table, you can then partition your hard drives using BSD disk labels.
Partition Fields
Each line in the Partitions section represents a disk partition. Each line in this section has five different fields:
- Mount Point
A mount point is the location within the directory hierarchy at which a volume exists. The volume is said to be mounted at this location. This field indicates where the partition will be mounted. If a partition exists, but is not set, then you need to define its mount point. Double-click on the partition or use the Edit key.
- Device
This field displays the partition's device name.
- Requested
This field shows the partition's original size. To redefine the size of a partition, you must delete the current partition and recreate it using the Add button.
- Actual
This field shows the space currently allocated to the partition.
- Type
This field shows the partition's type (for example, Linux Native).
Recommended Partitioning Scheme
Unless you have a reason for doing otherwise, we recommend that you create the following partitions:
A swap partition — swap partitions are used to support virtual memory. In other words, data is written to a swap partition when there is not enough RAM to store the data your system is processing. If you are unsure about what size swap partition to create, make it equal to the amount of RAM on your machine. In Disk Druid, the partition field for swap should look similar to the following:
<Swap> sda2 256M 258M Linux swap
A /boot partition (as small as possible; 16 MB maximum) — the partition mounted on /boot will be the SRM boot partition and will contain aboot, the boot loader which will load Red Hat Linux. In Disk Druid, the partition field for /boot should look similar to:
/boot sda1 16M 23M Linux native
A root Linux partition — where "/" (the root directory) resides. In this setup, all files (except those stored in /boot) reside on the root partition. A 850MB root partition will permit the equivalent of a workstation-class installation (with very little free space), while a 2 GB root partition will let you install every package. You may wish to have more than one Linux partition. For example, if you'd like to have /usr on its own disk partition, you'll need to create the /usr partition now. In Disk Druid, the partition field for / should look similar to:
/ sda3 1M 8385M Linux native
Problems When Adding a Partition
As you scroll through the Partitions section, you might see an Unallocated Requested Partition message (in red text), followed by one or more partitions. A common reason for this is a lack of sufficient free space for the partition. In any case, the reason the partition remains unallocated will be displayed after the partition's requested mount point.
If you attempt to add a partition and Disk Druid can't carry out your request, you'll see a dialog box listing partitions that are currently unallocated, along with the reason they could not be allocated. Unallocated partition(s) are also displayed on Disk Druid's main screen (you may have to scroll through the Partitions section to see them).
To fix an unallocated requested partition, you must move the partition to another drive which has the available space, resize the partition to fit on the current drive, or delete the partition entirely. Make changes using the Edit button or by double clicking on the partition.
Drive Summaries
Each line in the Drive Summary section represents a hard disk on your system. Each line has the following fields:
- Drive
This field shows the hard disk's device name.
- Geom [C/H/S]
This field shows the hard disk's geometry. The geometry consists of three numbers representing the number of cylinders, heads and sectors as reported by the hard disk.
- Total
This field shows the total available space on the hard disk in megabytes.
- Free
This field shows how much of the hard disk's space is still unallocated in megabytes.
- Used
These fields show how much of the hard disk's space is currently allocated to partitions, in megabytes and percentage.
The Drive Summaries section is displayed only to indicate your computer's disk configuration. It is not meant to be used as a means of specifying the target hard drive for a given partition; to do that, you'll need to use the Allowable Drives field in the section called Adding Partitions.
Disk Druid's Buttons
These buttons control Disk Druid's actions. They are used to add and delete partitions, and to change partition attributes. There are also buttons that are used to accept the changes you've made, or to exit Disk Druid. Let's take a look at each button in order.
- Add
Used to request a new partition. When selected, a dialog box will appear containing fields (such as mount point and size) that must be filled in.
- Edit
Used to modify attributes of the partition currently selected in the Partitions section. Selecting Edit will open up a dialog box. Some or all of the fields can be edited, depending on whether the partition information has already been written to disk.
- Delete
Used to remove the partition currently highlighted in the Current Disk Partitions section. You'll be asked to confirm the deletion of any partition.
- Reset
Used to restore Disk Druid to its original state. All changes made will be lost if you Reset the partitions.
- Make RAID Device
Make RAID Device can be used if you want to provide redundancy to any or all disk partitions. It should only be used if you have experience using RAID. To read more about RAID, please refer to the Official Red Hat Linux Reference Guide.
Adding Partitions
To add a new partition, select the Add button. A dialog box will appear (see Figure 3-9).
 | Please Note |
|---|---|
You will need to dedicate at least one partition to Red Hat Linux, and optionally more. These basic issues are discussed more completely in the An Introduction to Disk Partitions chapter in the Official Red Hat Linux Reference Guide. |
Mount Point: Highlight and enter the partition's mount point. For example, if this partition should be the root partition, enter /; enter /boot for the /boot partition, and so on. You can also use the pull-down menu to choose the correct mount point for your partition.
Size (Megs): Enter the size (in megabytes) of the partition. Note this field starts with a "1" in it; unless changed you'll end up with a 1 MB partition.
Use remaining space: This checkbox indicates if the size you entered in the previous field is to be considered the partition's exact size, or its minimum size. When selected, the partition will grow to fill all available space on the hard disk. The partition's size will expand and contract as other partitions are modified. You can make multiple partitions growable; if you do, the additional free space will be shared among all growable partitions.
Partition Type: This field contains a list of different partition types (for example, Linux Native). Select the appropriate partition type using the mouse.
Allowable Drives: This field contains a list of the hard disks installed on your system. If a hard disk's box is highlighted, then a desired partition can be created on that hard disk. If the box is not checked, then the partition will never be created on that hard disk. By using different checkbox settings, you can direct Disk Druid to place partitions as you see fit, or let Disk Druid decide where partitions should go.
Ok: Select Ok once you're satisfied with the settings, and wish to create the partition.
Cancel: Select Cancel if you don't want to create the partition.
Editing Partitions
To edit a partition, select the Edit button or double-click on the existing partition (see Figure 3-10).
 | Please Note |
|---|---|
If the partition already existed on your hard disk, you will only be able to change the partition's mount point. If you want to make any other changes, you will need to delete the partition and recreate it. |
Deleting a Partition
To delete a partition, highlight it in the Partitions section and double-click the Delete button. You will be asked to confirm the deletion.
Skip to the section called Formatting Partitions for further installation instructions.
Partitioning with fdisk
If you've chosen to use fdisk to manually partition your system, read this section. If are not using fdisk, please skip to the section called Automatic Partitioning for automatic partitioning or the section called Partitioning with Disk Druid for partitioning with Disk Druid.
 | fdisk is Not Particularly User-Friendly |
|---|---|
Unless you have previously used fdisk and understand how it works, we do not recommend that you use it. Disk Druid is easier to understand than fdisk. To exit fdisk click Back to return to the previous screen, deselect fdisk, and then click Next. |
SRM Partitioning Requirements
When you allow the Red Hat Linux installation program to partition for you (automatic partitioning), the installation program will handle certain special partitioning requirements for SRM. Disk Druid is also aware of SRM's partitioning requirements and will partition your system accordingly. If you use fdisk to partition manually, however, you'll need to be aware of these issues, since you'll need to take care of them yourself. Special partitioning issues for SRM include the following:
You'll need to use BSD-style disklabels. When you use fdisk in the graphical installation program, it will start in BSD disklabel mode.
You'll need to leave unallocated space at the beginning of your hard drive.
You'll need to use BSD-style disklabels because of aboot's partitioning requirements. When you're using the SRM firmware to boot Linux, you're using the aboot bootloader. The aboot program supports the creation of bootable block devices and contains a program which can load Linux kernels from a filesystem that is bootable by SRM.
The aboot program does not understand DOS-style partition tables. You'll need to use BSD-style disklabels, which aboot does understand.
BSD-style disk labeling is different in certain ways from standard fdisk-style partitioning (used on x86 installations) in the following ways:
The partitions are identified by letters (a, b, c...) instead of numbers.
The partition types are different. For example, instead of using "83" and "82" to correspond to "Linux" and "Linux Swap," respectively, ext2 partitions are identified as "8"; the swap partition is "1".
You can have a maximum of eight partitions (a to h) per drive.
Partition types must be explicitly set after creation. The BSD disklabel program uses a default partition type of "unknown" which causes the Disk Setup portion of the installation program not to see the partitions.
Another requirement for partitioning is that you provide initial unallocated space at the beginning of the hard drive. The initial unallocated space is unallocated disk space that is not explicitly allocated to any label other than the "whole disk" label. This space should be approximately 1 MB to 10 MB (2048 to 20480 sectors), depending on exactly what configuration of aboot you're using.
The unallocated disk space provides space at the very beginning of the hard drive for aboot to write the boot block and object file that allows booting to kernels located within the disk labels. For more information on the process aboot uses to boot, please see the SRM Firmware HOWTO at the following URL:
http://www.alphalinux.org/faq/srm.html |
 | Warning |
|---|---|
To provide the initial unallocated space, you'll need to start your partitions at cylinder 2. If you do a workstation- or server-class installation and allow the installation program to partition for you, the installation program will provide the initial unallocated space. If you're using Disk Druid, Disk Druid knows about this requirement, and it will not allow you to start the partitions at cylinder 1 during manual partitioning. If you're using fdisk, however, you'll need to remember to start your partitions at cylinder 2. |
Using fdisk
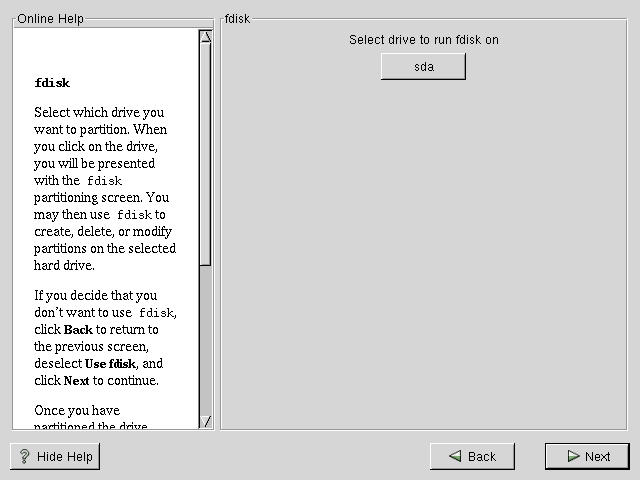
If you have chosen to use fdisk, the next screen (see Figure 3-11) will prompt you to select a drive to partition using fdisk.
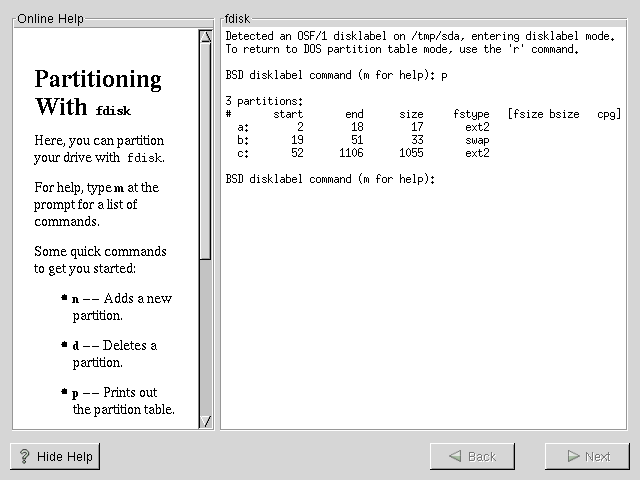
Once you have chosen which drive to partition, you will be presented with the fdisk command screen (see Figure 3-12). If you are unsure as to what command you should use, type m at the prompt for help.
The following table provides the most common fdisk commands.
Table 3-2. fdisk commands
| Command | What it Does |
|---|---|
| b | enters BSD disklabel command line mode |
| m | displays help |
| p | displays the current partition table |
| d | deletes a partition |
| n | creates a new partition |
| w | writes the partition table to disk |
| t | sets the type of partition |
| L | display the list of partition types |
| q | quits fdisk |
You'll need to be aware of a few issues regarding partitioning with fdisk. First, Linux fdisk creates partitions of type unknown by default. When you create partitions, don't forget to change swap partitions to type Linux swap, and Linux partitions to type ext2 using the t command. The value for the Linux swap type is 1; ext2 partitions are 8. For other partition types, use the L command to see a list of partition types and values.
Linux allows up to four (4) partitions on one disk. If you wish to create more than that, one (and only one) of the four may be an extended partition, which acts as a container for one or more logical partitions. Since it acts as a container, the extended partition must be at least as large as the total size of all the logical partitions it is to contain.
It's a good idea to write down which partitions (e.g., /dev/sda2) are meant for which filesystems (for example, /usr) as you create each one.
When you've finished making partitions, type w to save your changes and quit. You will be taken back to the original fdisk screen where you can choose to partition another drive or continue with your installation.
When you are finished partitioning your disks, press Done; you may see a message indicating that the installation program needs to reboot. This is a normal occurrence after changing a disk's partition data; it usually happens if you created, changed or deleted any extended partitions. After you press OK, your machine will reboot and the installation will begin again. Repeat the same installation steps you performed earlier until you reach the Partition Disks dialog; then simply choose Done.
 | Please Note |
|---|---|
None of the changes you make take effect until you save them and exit fdisk using the w command. You can quit fdisk at any time without saving changes using the q command. |
After you have partitioned your drive(s), click Next. Then you'll need to use Disk Druid to assign mount points to the partitions you just created with fdisk.
You will not be able to add new partitions using Disk Druid, but you will be able to edit mount points for those you have already created.
For each partition you created with Disk Druid, click on the Edit button, choose the appropriate mount point for that partition from the pull-down menu, and click on OK.
See the section called Formatting Partitions for further installation instructions.
